
Want to shave minutes off your run without ever being seen?
This loadout is for runners who only use stealth and demand speed.
It boils down to three things: stay silent, move faster, and kill in one hit.
Pick the wrong dagger, armor, or stats and you lose seconds or reset the run.
In this post I break down exact weapons, armor mods, stat spreads, mobility tools, and skill choices that hit those three goals, plus when to swap if a room or patch ruins the plan.
Optimal Stealth Assassin Speedrun Loadout Breakdown
A top stealth assassin speedrun loadout comes down to three things: staying silent, moving fast, and killing in one hit. Everything else is noise. You’re trying to stay invisible longer, close gaps between targets faster, and drop enemies before they can react. Every piece of gear needs to push at least one of those goals forward. Pick the wrong weapon or dump stats in the wrong place and you’re looking at extra seconds per segment, or worse, a reset when some guard survives your backstab and screams.
Gear breaks into two groups. Stealth enablers and time savers. Stealth enablers are your quiet clothes, detection-radius perks, and weapons that don’t make sound. Time savers are mobility tools, animation cancels, and anything that bumps sprint speed or cuts takedown time. You need both to keep your invisibility up while carving seconds off each segment. The gap between a three-minute run and a four-minute one? Sometimes it’s just one armor mod that drops your crouch penalty by 15%. Or a dagger that shaves half a second off your takedown animation.
Stat spreads usually max agility first, then stack perception or dexterity for crits and damage, then drop the bare minimum into strength so you can equip your gear without hitting encumbrance. A typical endgame spread looks like 9 to 10 agility, 6 to 8 perception, 4 to 5 strength, and 3 to 4 utility. Anything else slows you down or leaves you one damage point short of a guaranteed kill.
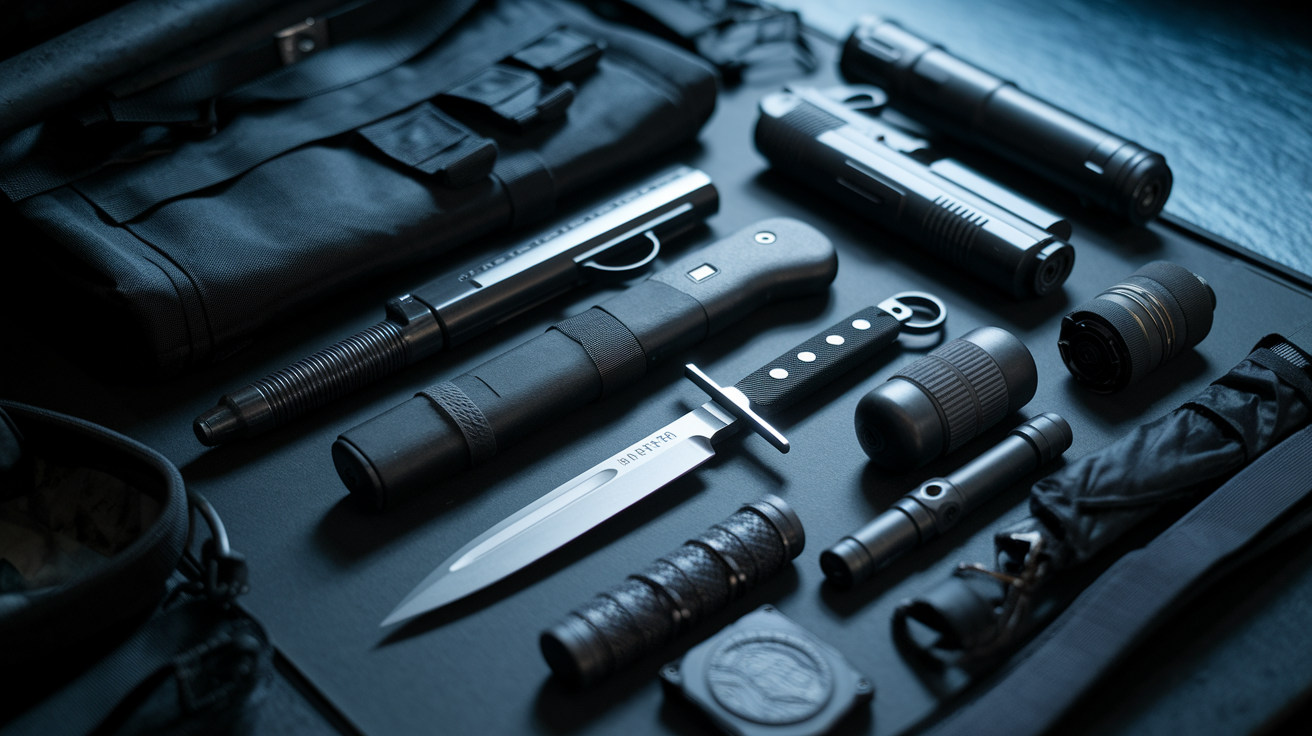
- Primary weapon: High damage dagger or short blade with backstab multiplier and bleed or armor piercing mod. You want 600 to 900 effective stealth damage on backstab.
- Backup weapon: Silenced pistol or suppressed SMG with crit chance mod. Use it for ranged blindspots or when you’re chaining multiple targets.
- Armor and clothing: Full stealth set with combined +40 to 60% noise reduction and -30 to 50% visibility reduction. Focus on leg and boot slots for silent step mods.
- Utility tools: Smoke bombs, distraction devices, throwable noise makers. Only use them when they save more than 2 seconds versus just waiting for a patrol gap.
- Mobility tools: Grappling hook, silent rope, or camo cloak with 5 to 12 second invisibility duration and sub-30 second cooldown.
- Core skills: Maxed or near maxed Stealth skill (Rank 3 to 5), Critical Assassin perks (Rank 2 to 3), Quick Takedown (Rank 4), Silent Step (Rank 3).
- Stat priorities: Agility 9 to 10, then Perception 6 to 8, then Strength 4 to 5 (minimum to equip gear without encumbrance penalty), then Utility 3 to 4.
Core Stealth Execution Techniques

Silent movement in speedruns is about timing transitions and managing surface noise. Crouch walking generates zero audio cue on most surfaces, but it’s slow. Speedrunners use crouch to sprint cancels by tapping crouch and sprint in rapid succession. This keeps you silent for the first 0.3 to 0.6 seconds of the sprint animation before the game registers full footstep audio. That micro window lets you close distance on guards without tripping their audio detection threshold. Practice the cancel timing in safe zones until you can chain three or four cancel bursts across a room without a single audible step showing up on enemy awareness meters.
Best takedown windows happen when a guard is stationary, facing away, and isolated from their patrol partner’s line of sight. Speedrunners wait for the exact frame when the guard’s turn animation peaks, then initiate the takedown input during the 0.2 to 0.4 second window before the guard resumes forward movement. Killing during this window prevents mid-takedown detection and stops the body from falling into another guard’s vision cone. Start the takedown 0.5 seconds too early and the guard’s patrol partner rounds the corner mid-animation and spots you. Start it too late and the guard turns and sees you before the kill registers.
Vision cone manipulation requires memorizing patrol loops and positioning yourself in the guard’s blind zone, typically 30 to 45 degrees behind the shoulder line. Even with maxed stealth stats, standing directly in the center of a guard’s rear arc can trigger peripheral detection if you move or if light sources shift. Experienced runners hug walls, use props to break line of sight, and step into shadows whenever a guard pauses or changes direction. Safest position is always one step outside the guard’s maximum detection radius, moving only when the guard commits to forward movement or a full turn away.
Movement Tech for Faster Stealth Clears

Advanced movement tech cuts total run time by chaining mobility tricks that keep you in stealth state while covering ground faster than normal crouch walk. Slide boosting works by starting a crouch slide on a slight downward slope, then immediately canceling into a sprint at the end of the slide animation. The game preserves part of the slide’s momentum during the first sprint step, giving you a 10 to 15% speed boost for about 1.2 seconds. Chain three slide boosts across a large room and you save 2 to 4 seconds compared to crouch walking the same distance.
Gap skipping and ledge cancel techniques let you bypass staircases, elevators, or long detours by mantling onto small environmental props and chaining vaults. A well executed ledge cancel can cut 6 to 10 seconds from vertical traversal segments. The trick is finding props at the correct height, usually waist high crates, railings, or window ledges. You mantle onto the first prop, immediately input a directional jump toward the next ledge, and cancel the landing animation by crouching mid-air. The crouch input suppresses the landing noise and keeps your stealth state active.
- Crouch sprint cancel: Tap crouch, then sprint within 0.2 seconds. Keeps you silent for the first half second of sprint. Chain 3 to 4 cancels per room.
- Slide boost chain: Start crouch slide on any downward slope, cancel into sprint at slide end. Adds 10 to 15% speed for about 1.2 seconds.
- Ledge cancel vault: Mantle onto waist high prop, directional jump to next ledge, crouch mid-air to suppress landing noise.
- Corner peek snap: Approach corner in crouch, tap aim down sights to snap camera around corner without exposing body. Saves 0.5 to 1.0 seconds per room entry.
- Animation cancel takedown: Input sprint or crouch immediately after takedown finishes to skip 0.3 to 0.5 second post kill recovery animation.
Route Planning and Enemy Pattern Optimization

Route planning starts with mapping every guard’s patrol loop and identifying the repeating cycle length. Most guards follow a 12 to 30 second loop with predictable turn points and pause windows. Speedrunners time their entry into each room to sync with the moment when the maximum number of guards are facing away or clustered in positions that allow chained takedowns. If a patrol cycle forces you to wait more than 3 seconds for a safe window, the route needs adjustment. Either find an alternate path that bypasses the guard entirely, or use a distraction item to pull the guard off their loop and create an artificial opening.
Multi floor routes require vertical timing coordination. Guards on upper floors often have vision cones that cover stairwell entries or elevator exits. The fastest routes avoid these choke points by using external ledges, vent shafts, or window entries that drop you into blind zones on the target floor. When a vertical bypass isn’t available, speedrunners memorize the exact moment when the stairwell guard turns away and sprint up during that 2 to 4 second window. Miss the window by half a second and you’re waiting another full patrol cycle, which costs 8 to 15 seconds.
RNG variance shows up in guard starting positions, slight timing drift in patrol loops, and random pause behaviors. Top runners prepare two or three alternate micro routes for high variance rooms. If Guard A spawns 2 meters left of their normal position, you switch from Route A (direct backstab) to Route B (bypass via left corridor). The decision happens in real time based on what you see in the first 0.5 seconds after entering the room. Practicing these decision trees during route rehearsal is what separates consistent sub 3:00 runners from players who reset every third attempt.
Your loadout directly impacts which routes are viable. A dagger build with high movement speed can take aggressive central paths through rooms, chaining kills in rapid succession. A ranged silenced pistol build must use perimeter routes with longer sightlines and more cover. If your gear lacks sufficient noise reduction, you can’t use sprint cancel techniques in echo heavy tile or metal floor rooms, which forces slower crouch only paths and adds 5 to 12 seconds to those segments.
Advanced Time Savers and Risk Reward Micro Optimizations

Frame tight skips involve exploiting small gaps in enemy detection logic or animation states. One common example is the “detection fade skip,” where you break line of sight with a guard exactly as their awareness meter hits 90%, then immediately re-enter stealth before the meter crosses the 100% alert threshold. The game resets the meter to zero if you stay out of sight for 0.8 to 1.2 seconds, allowing you to push through rooms at higher risk without triggering full alerts. The timing window is narrow. Re-enter sight at 0.7 seconds and the alert triggers. Wait 1.3 seconds and you waste time. Perfect execution saves 3 to 6 seconds per risky room but requires dozens of practice runs to internalize the exact timing.
High risk mobility shortcuts include sprinting through camera sweep zones, using active camo during overlapping patrol intersections, and chaining kills in rooms where a single mistake triggers cascading alerts. These shortcuts are only worth the risk if they save more than 8 to 10 seconds and if your current segment time is already within 2 to 3 seconds of your target split. Attempting a high risk skip when you’re already 5 seconds behind target pace often leads to resets and wasted attempts. Experienced runners know when to play it safe and when to push for aggressive optimizations.
- Detection fade skip: Break line of sight at 85 to 95% awareness, stay hidden for 0.9 to 1.1 seconds, re-enter. Saves 3 to 6 seconds per room when executed cleanly.
- Camera sweep sprint: Sprint through rotating camera blindspot during the 1.5 to 2.5 second window between sweeps. Cuts 4 to 8 seconds off camera heavy corridors.
- Overlapping patrol bypass: Use active camo or smoke bomb to cross intersection where 2 to 3 patrol paths converge. Saves 6 to 12 seconds versus waiting for all guards to clear.
- Chained multi target kills: Kill 3 to 4 guards in rapid sequence (0.6 to 0.8 seconds per kill) before any awareness meter fills. High execution demand but saves 10 to 18 seconds on clustered rooms when successful.
Alternative Stealth Builds and Comparative Analysis
The meta dagger build isn’t the only functional option for stealth speedruns. Lightweight mobility builds sacrifice some one shot kill reliability in favor of maximum movement speed and traversal tools. These builds equip minimal armor, stack movement speed mods, and use ranged weapons for safe kills from elevated positions. They excel on maps with lots of vertical space and long sightlines but struggle in tight interiors where close quarters combat is unavoidable. Run times are typically 5 to 10% slower than the meta build on standard maps but can match or beat meta times on open or multi floor layouts.
Hybrid crit based builds split stats between agility and perception to maximize critical hit chance and damage. The goal is to guarantee one shot kills on heavily armored targets that survive normal backstabs. This build uses silenced pistols or crossbows with crit damage mods and trades some movement speed for higher damage ceiling. It’s popular in challenge categories that disable stealth multipliers or require pacifist no kill runs where you stun instead of kill. Expected run times are 8 to 15% slower than meta dagger builds but offer more consistency against tanky enemy types.
| Build Type | Strengths | Weaknesses |
|---|---|---|
| Meta Dagger (Agility/Stealth) | Fastest takedowns, best close quarters clear, consistent sub 3:00 on compact maps, highest stealth damage multiplier | Requires tight execution, fails on missed backstabs, limited ranged options, vulnerable during multi target rooms if positioning is off |
| Lightweight Mobility | Maximum movement speed, best vertical traversal, strong on open or multi floor maps, flexible pathing | Lower damage per hit, 5 to 10% slower on tight interiors, requires more ammo management, higher reset rate on mistakes |
| Hybrid Crit Based | High damage ceiling, reliable against armored targets, strong in no kill or stun only categories, ranged flexibility | 8 to 15% slower average clear time, split stats reduce movement speed, more RNG dependent on crit rolls, harder to optimize route timings |
| Gadget Focused (Smoke/Distraction) | Safest option for beginner speedrunners, easiest to learn routes, low reset rate, forgiving execution windows | 10 to 20% slower than meta, heavy consumable management, limited utility on maps with few distraction points, not viable for top tier times |
Gadget focused builds rely on throwable distractions, smoke bombs, and noise makers to manipulate guard positions instead of relying on pure stealth stats and movement tech. This approach is the safest and most forgiving for players new to stealth speedrunning. You can create safe windows even when patrol RNG is unfavorable, and the build handles mistakes better because you have multiple tools to recover from partial detections. The trade off is total run time. Gadget builds are typically 10 to 20% slower than meta dagger builds and require careful consumable management. You can’t spam items without running out before the final segments, so you must plan exactly where each distraction saves the most time.
Final Words
Mid-run, your optimized stealth assassin loadout cuts encounters and turns risky rooms into time gains. We broke down exact gear, core takedowns, movement tech, route planning, and late-run shortcuts.
Focus on three priorities: sound suppression, consistent takedown windows, and animation cancels. If a trick fails, reset the route instead of forcing a risky skip.
If you want one clear next step, lock the recommended stealth assassin loadout for stealth-only speedruns, then practice the core movement tricks on a single route. Do runs, tweak, and expect steady time drops.
FAQ
Q: What is the best stealth weapon in Cyberpunk?
A: The best stealth weapon in Cyberpunk is a suppressed handgun or silenced sniper depending on range; prioritize high headshot damage, critical multipliers, and suppressor mods for instant, no-alert takedowns.
Q: Is sneak worth it in Outer Worlds 2?
A: Sneak in Outer Worlds 2 is worth it for skipping fights, scoring powerful sneak-attack damage, and controlling pacing; pick sneak for utility and survival, switch to full combat if you prefer direct engagements.
Q: What’s the best assassin build in Skyrim?
A: The best assassin build in Skyrim is a high-sneak dagger/archer hybrid: max Sneak, invest in One‑Handed (dagger perks), Archery, Light Armor, Smithing and Enchanting for reliable one‑shot stealth kills.
Q: What is the best armor for stealth in Fallout 4?
A: The best armor for stealth in Fallout 4 is light, quiet clothing or armor pieces with noise-reducing mods—use Leather/Synth parts, equip Muffled/Shadow mods, and stack Sneak and Ninja perks plus Stealth Boy bursts.